Listen up, folks. If you're diving into the world of Raspberry Pi and wondering how to use access Raspberry Pi from anywhere free, you've come to the right place. Imagine being able to control your Raspberry Pi remotely without spending a dime. Sounds awesome, right? Well, it's not just a dream. With the right tools and techniques, you can achieve this and more. So, let’s dig in and make it happen.
Remote access to your Raspberry Pi opens up endless possibilities. Whether you're a hobbyist tinkering with IoT projects or a tech enthusiast looking to streamline your workflow, understanding how to access Raspberry Pi from anywhere free is a game-changer. This guide will walk you through every step, making sure you're set up for success.
Now, before we dive deep, let me warn you—this isn't just another generic tutorial. We're going to break it down step-by-step, share some pro tips, and even throw in some troubleshooting advice. So grab your coffee, sit back, and let's make your Raspberry Pi dreams a reality.
Read also:Pining For Kim Tailblazer Free The Ultimate Guide To Unlocking Your Fashion Potential
Why Access Raspberry Pi from Anywhere?
Let's face it—Raspberry Pi is more than just a tiny computer. It's a powerhouse for innovation. But what if you could harness its potential without being tied to your home network? That's where remote access comes in. By learning how to use access Raspberry Pi from anywhere free, you gain flexibility, convenience, and control. Whether you're monitoring a security camera, managing a home automation system, or running a server, remote access makes life easier.
Benefits of Remote Access
Here's a quick rundown of why remote access matters:
- Flexibility: Control your Raspberry Pi from any location.
- Cost-Effective: No need for expensive third-party services.
- Efficiency: Streamline your projects and save time.
- Security: Safeguard your data while accessing it remotely.
What You’ll Need to Get Started
Before we dive into the nitty-gritty, let’s talk about what you’ll need. Don’t worry, it’s nothing fancy. Just your trusty Raspberry Pi, a stable internet connection, and a bit of patience. Here’s the list:
- Raspberry Pi (any model will do).
- Raspberry Pi OS installed on an SD card.
- A reliable internet connection.
- A static IP address or dynamic DNS setup.
- A SSH client like PuTTY (for Windows) or Terminal (for Mac/Linux).
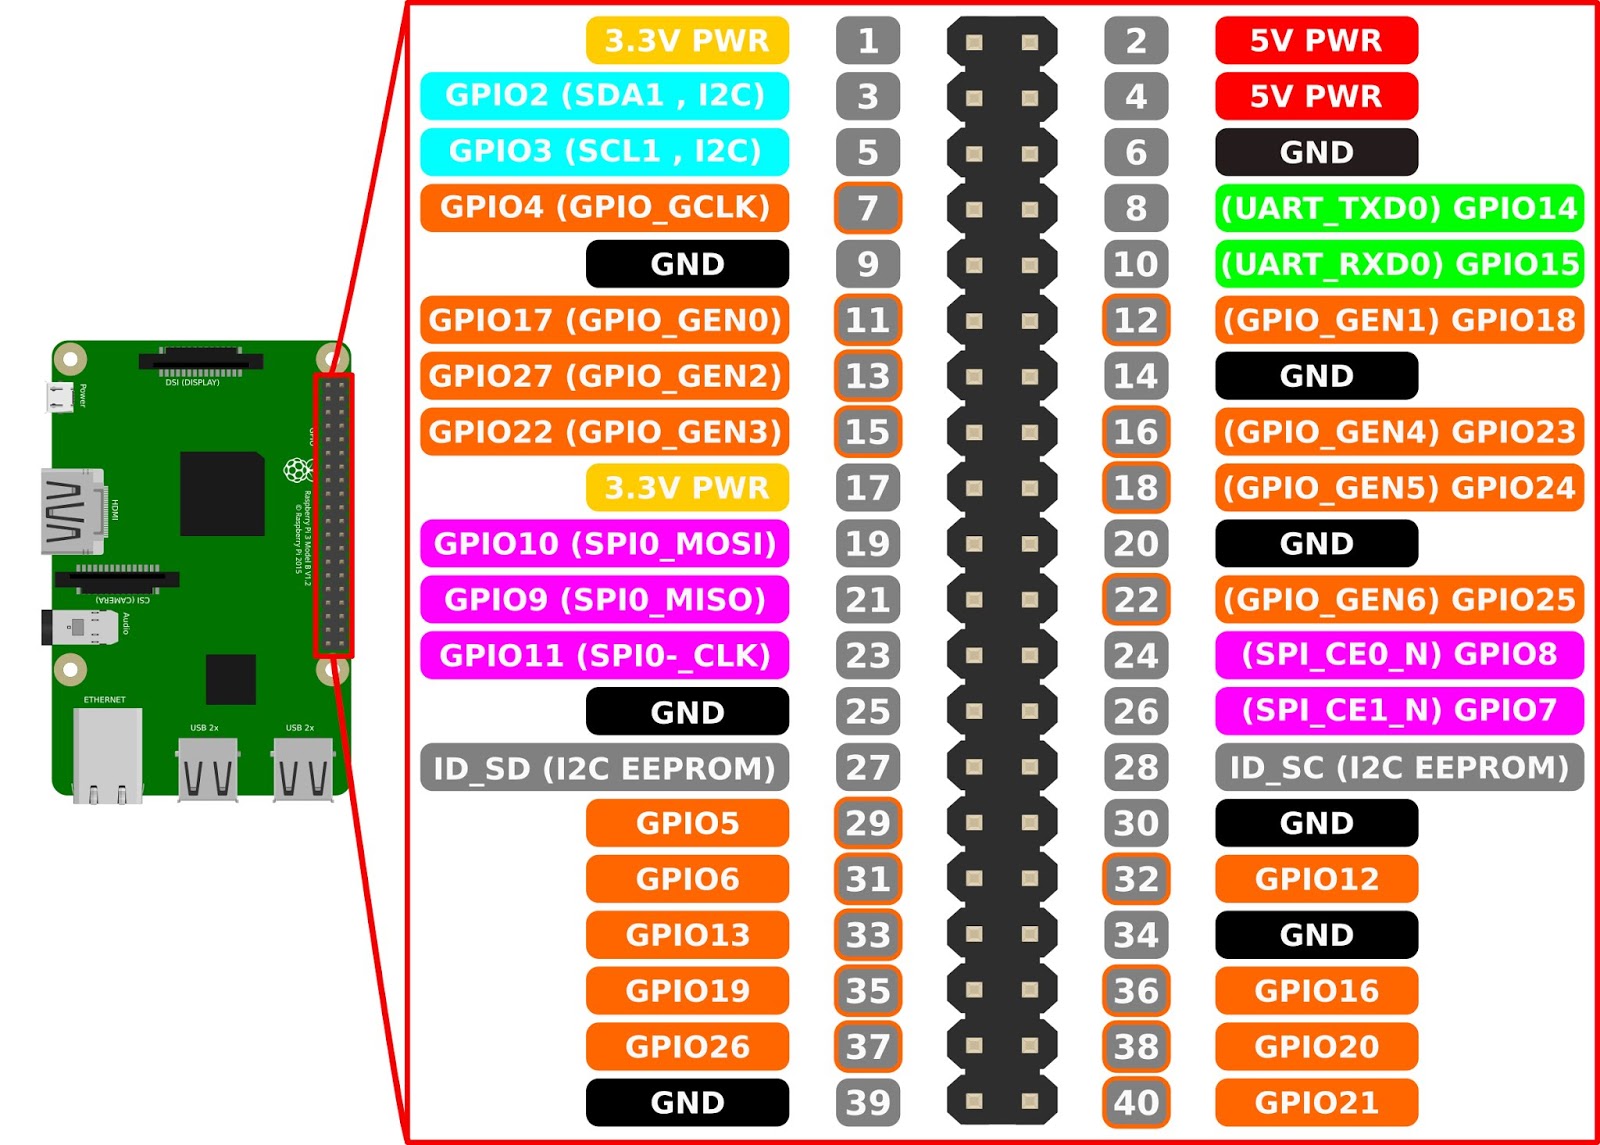
Step 1: Enable SSH on Your Raspberry Pi
SSH, or Secure Shell, is the backbone of remote access. Think of it as a secure tunnel that lets you connect to your Raspberry Pi from anywhere. Here's how you enable it:
Method 1: Through the Raspberry Pi Configuration Tool
- Open the terminal on your Raspberry Pi.
- Type
sudo raspi-configand hit Enter. - Navigate to
Interfacing Optionsand selectSSH. - Choose
Yesto enable SSH.
Method 2: Create an SSH File
Read also:Karla James The Rising Star Whos Making Waves In The Entertainment World
- Insert your SD card into your computer.
- Create an empty file named
ssh(no file extension) in the boot partition. - Insert the SD card back into your Raspberry Pi and boot it up.
Troubleshooting SSH Issues
Can’t connect via SSH? Here are some common fixes:
- Ensure your Raspberry Pi is connected to the internet.
- Double-check your IP address and SSH settings.
- Make sure your firewall isn’t blocking SSH traffic.
Step 2: Set Up a Static IP Address
A static IP address ensures your Raspberry Pi always has the same address on your network. This makes it easier to connect remotely. Here’s how:
- Open the terminal and type
ifconfigto find your current IP address. - Edit the
/etc/dhcpcd.conffile usingsudo nano /etc/dhcpcd.conf. - Add the following lines at the bottom:
interface eth0 static ip_address=192.168.1.100/24 static routers=192.168.1.1 static domain_name_servers=192.168.1.1Replace the IP addresses with your network settings.
Why Static IP Matters
With a static IP, you avoid the hassle of your Raspberry Pi’s address changing every time it reconnects to the network. Trust me, it saves a ton of headaches.
Step 3: Configure Port Forwarding
Port forwarding is like setting up a direct line to your Raspberry Pi through your router. Here’s how you do it:
- Log in to your router’s admin panel (usually at
192.168.1.1). - Find the port forwarding section (it might be under Advanced Settings).
- Create a new rule for port 22 (the default SSH port).
- Set the internal IP address to your Raspberry Pi’s static IP.
Tips for Port Forwarding
Stuck on port forwarding? Here’s what to check:
- Make sure your router supports port forwarding.
- Double-check the port number and IP address.
- Restart your router after making changes.
Step 4: Use Dynamic DNS for Easy Access
Dynamic DNS (DDNS) is a lifesaver if your ISP changes your public IP address frequently. Services like No-IP or DuckDNS let you assign a domain name to your Raspberry Pi, making it easier to access. Here’s how:
- Sign up for a free DDNS service.
- Download and install their client on your Raspberry Pi.
- Follow the setup instructions to link your domain name to your public IP.
Choosing the Right DDNS Service
Not all DDNS services are created equal. Look for one that’s reliable, easy to set up, and offers a free tier. Some popular options include:
- No-IP
- DuckDNS
- FreeDNS
Step 5: Secure Your Remote Connection
Security should always be a priority when accessing your Raspberry Pi from anywhere. Here’s how to lock it down:
- Change the Default SSH Port: Move it from 22 to something less obvious.
- Use Strong Passwords: Avoid using simple passwords or default credentials.
- Enable Two-Factor Authentication: Add an extra layer of protection.
Advanced Security Tips
For extra peace of mind, consider these:
- Use SSH keys instead of passwords.
- Limit SSH access to specific IP addresses.
- Regularly update your Raspberry Pi’s software.
Step 6: Test Your Setup
Now that everything’s in place, it’s time to test your setup. Grab your laptop or smartphone and try connecting to your Raspberry Pi using its DDNS domain name. If everything’s working, you should be able to SSH into it without any issues.
Troubleshooting Common Issues
Can’t connect? Here’s what to check:
- Ensure your router’s firewall isn’t blocking SSH traffic.
- Verify your DDNS domain name is correctly linked to your public IP.
- Double-check your port forwarding settings.
Conclusion
There you have it, folks—your ultimate guide on how to use access Raspberry Pi from anywhere free. With SSH, static IP, port forwarding, and DDNS, you’ve got all the tools you need to take control of your Raspberry Pi remotely. Remember, security is key, so always take the necessary precautions to protect your setup.
So, what are you waiting for? Dive in, experiment, and make the most of your Raspberry Pi. And don’t forget to leave a comment below or share this guide with your fellow tech enthusiasts. Happy tinkering!
Table of Contents
- Why Access Raspberry Pi from Anywhere?
- What You’ll Need to Get Started
- Step 1: Enable SSH on Your Raspberry Pi
- Step 2: Set Up a Static IP Address
- Step 3: Configure Port Forwarding
- Step 4: Use Dynamic DNS for Easy Access
- Step 5: Secure Your Remote Connection
- Step 6: Test Your Setup
- Benefits of Remote Access
- Conclusion